


In my two previous blog posts, I recommended purchasing either the ASUS RT-AC56U or the ASUS RT-AC68U; explained why I chose the ASUS RT-AC68U router for my own home; and walked you through the setup of 2.4GHz and 5GHz bands for best performance. In this post, I’m going to show you how to tune your router to avoid wireless network traffic from other routers near by.
First off, how do WiFi frequency ranges and channels work?
The 802.11 standard allows wireless devices to be backward compatible, interoperable, and to work internationally. After WWII, the radio frequency spectrum in most countries was strictly controlled by the government, and was mostly allocated to police, military, and emergency service use. By the 1990’s, gradually, some of the high frequency (or “microwave”) spectrum was being derestricted. The 2.4GHz band became available in most countries around the world, and so it was adopted for several wireless technologies, including cell phones, Bluetooth devices and of course – WiFi. Now, nearly 30 years later, 2.4GHz band has become a very busy part of the spectrum indeed. The newer 5GHz WiFi band still has the advantage of much less data traffic – but due to physics, has the disadvantage of having a shorter signal range, meaning, the rooms in your home furthest from your router will have a noticeably weaker signal.
Both WiFi bands (2.4G and 5G) are divided into individual channels, each spaced a few megahertz from the next. By default, your router will automatically jump to the first channel it finds. However, you will get the fastest WiFi performance if you first check which channels have the least traffic and then manually set your router to that channel.
Avoiding the Busy Channels
First you’ll need to download a WiFi Analyzer app. If you have an Android smartphone, there is a free WiFiAnalyzer app that works very well. Unfortunately, there is no convenient free app like this for my iPhone, so I used my Windows 10 laptop to download an equally effective WiFi Analyzer app from my browser, free from the Microsoft App Store.
Once you download an app, you can see which channels are currently being used. Let’s start with the 2.4GHz band.
Here is the WifiAnalyzer app screen for the 2.4GHz band. My router is the one called BFRX-BUTTERS (the SSID I chose for the 2.4GHz band):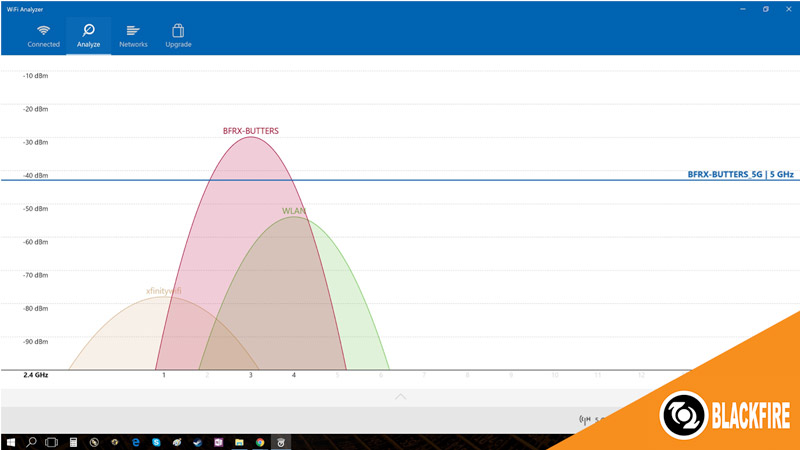
The ASUS router had auto-selected Channel 3, which is right on top of two other routers – probably my neighbors’ WiFi. As you can see from the image above, the channels above 6 look much clearer. So I opened up the ASUS router Configuration Page, which you can find by typing this local address into your web browser: http://router.asus.com
Under Advanced Settings, I selected the “Control Channel” pull-down menu, and instead of “Auto,” I selected “Channel 11” to force my router to operate in the clearer part of the spectrum: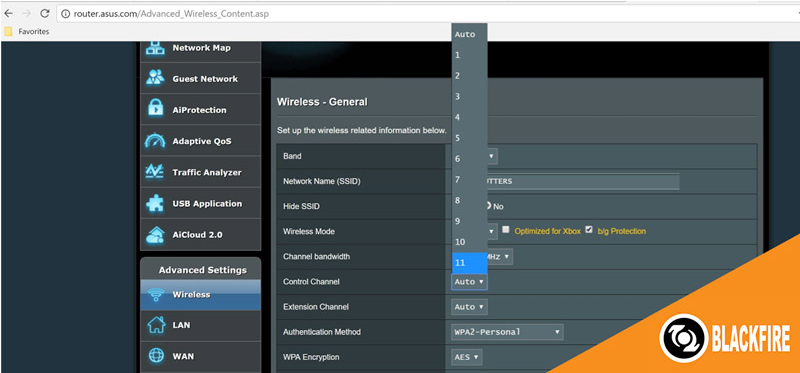
which means my router is much less likely to conflict with 2.4GHz band signals from other routers: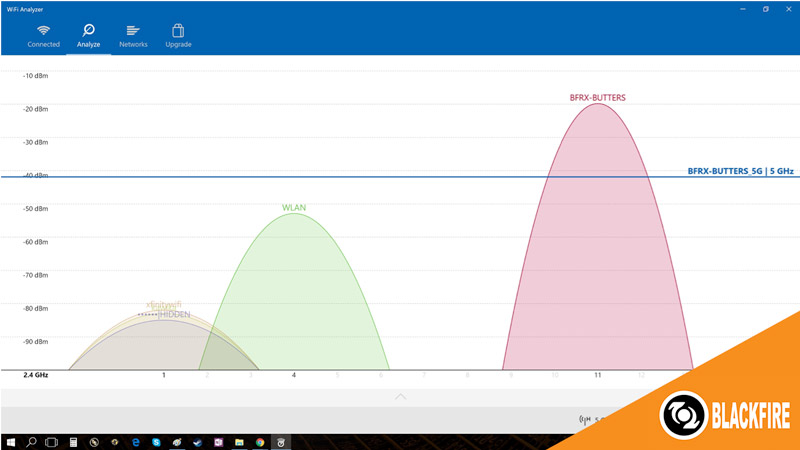
Next I checked the 5GHz band, which is much less busy; it looks like my neighbors have not yet taken advantage of newer routers like mine: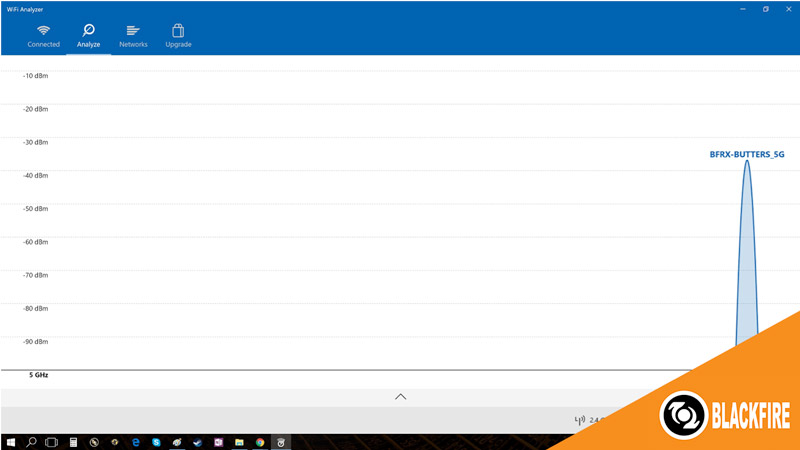
In the image above, my router (BFRX-BUTTERS_5G) has been auto selected to Channel 161 which is in a clear part of the band (note that the channels between 48 and 149 are not available for WiFi). To make sure it doesn’t auto select another channel, I decided to change the 5 GHz band setting from “Auto” to fix it at “Channel 161” anyway, using the same method as before:
Once you’ve switched your 2.4GHz and 5GHz bands to clearer channels, you’ll experience less interference from other networks – meaning that you can seamlessly stream music or videos throughout your home, wirelessly, with much less chance of pesky dropouts.